1
Adventures in Data Crunching - Asha Kinney - 2010
Adventures in Data Crunching - Asha Kinney - 2010
Excel 2: Adventures in Data Crunching
Importing Data from Text or .CSV Files
What kinds of les can I import?
Delimited text les (.txt) and Comma Separated Values (.csv) les.
A “Delimited” le uses a special designated character to tell excel where to start a new column or row. Files
can be tab delimited, space delimited, comma delimited, etc.
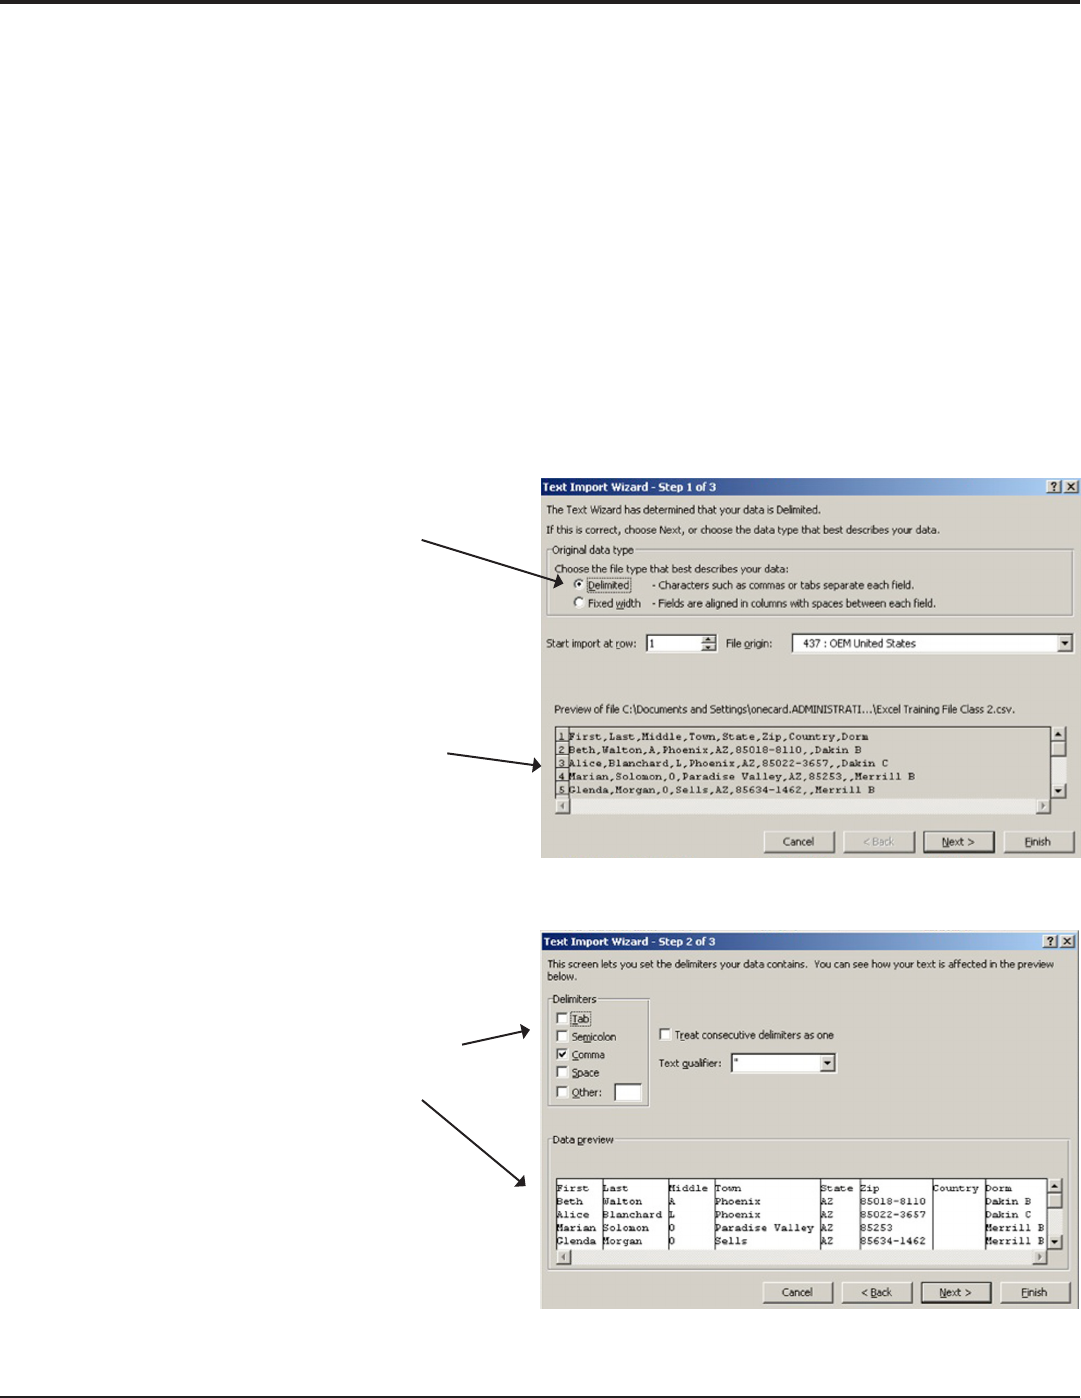
• Data Tab> Get External Data Group > From Text
• Find your le and click “get data”, then...
Step 1: Choose what kind of le you have.
“Delimited”- that there is a special character
separating each eld
-or-
“Fixed Width”- that you want to create a new
column every x-number of characters or spaces.
For this example we’re going to choose “delimited”.
is screen will give you a preview of how your le
will look.
Click “Next”.
Step 2: Tell Excel how that le is delimited.
Check o which delimiter your le uses.
If you’re not sure, check and un-check things
until the columns look right in the preview
window.
Click “Next”
2
Adventures in Data Crunching - Asha Kinney - 2010
Step 3: Tell Excel what kind of data each
column contains.
To do this, select a column or columns (shift-click to
select multiple columns). Selected columns appear
black.
Use the radio buttons to choose a data format.
“General” will import text as text and numbers
as numbers. “Text” will import everything as... text.
You can also specify date, and specic date
formatting.
Tip: If you have a eld of Zip codes, make sure to
set this eld as “text” so you don’t lose zeros
o the beginning of the zip codes.
Click “next”.
Final Step: Tell excel if you want your data in the
current spreadsheet, or if you want it to create
a new one in your workbook. Have it create a new
one unless you’re currently on a blank sheet.
Click “OK” and you’re done!
Filters
Filtering allows you to quickly sort your data or limit your view to just a certain criteria.
1. Make sure your spreadsheet has a header row with column titles.
2. Select your entire spreadsheet (this is so no columns get left out
accidentally)
3. Data Tab> Filter . is is an on/o button.
4. You will see small arrows in the cells of your header row. Click these for
a lter menu for that column. You can:
• “Sort A-Z” or “Z-A” to sort the spreadsheet by that eld (column).
• e bottom section is a list of all the dierent entries in that
column. Check or uncheck values to show only the checked values
or criteria.
• Use the middle section to clear any lters (show all), to lter by
color, or to create a custom Text Filter.
3
Adventures in Data Crunching - Asha Kinney - 2010
Adventures in Data Crunching - Asha Kinney - 2010
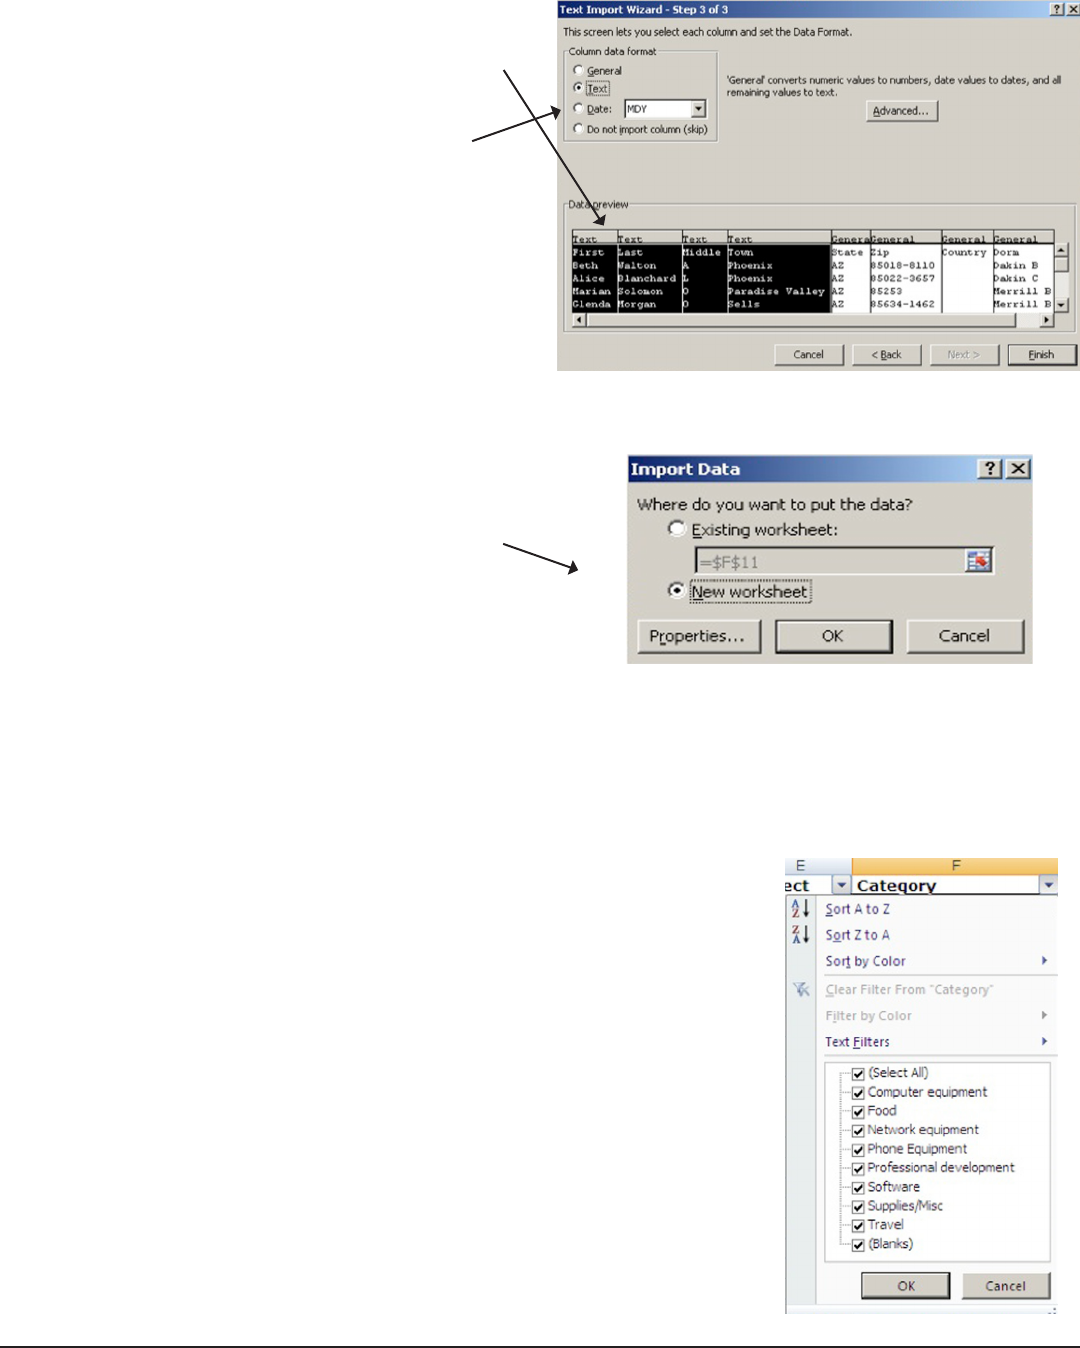
Subtotals
Excel can automatically subtotal your data for you.
1. Sort your data by the eld you want subtotals for.
2. Data Tab > Outline Group > Subtotal
3. From the rst drop-down menu, tell it which eld you
want subtotals for.
4. In the next menu, tell it what kind of subtotals you want.
Your main choices are:
• Sum- adds all the entries up (this is probably what
you’ll use most of the time).
• Count- simple counts the non-blank cells
• Average- averages all the entries
• Max- the highest # of all the entries
• Min- the lowest
• Product- multiplies all the entries.
5. Tell it which column contains the info you actually want
to add (or count, or etc). Check o as many as you want.
6. Click “OK”.
7. Click “Remove all” to get rid of existing subtotals.
Once you have subtotals, applied, you will see an outline view pane to the left of your data:
e top row shows three outline levels: 1, 2, and 3.
Level 1 is the grand total.
Level 2 is the subtotals.
Level 3 is each individual transaction.
You can double click on these numbers to snap to a view of only the information
for that outline level.
• If you want to see only the grand total, double click the “1”.
• If you want to see only the subtotals, double click the “2”.
• If you want to see everything again, double click the “3”.
Each individual area in the outline can be expanded for viewing, or collapsed for hiding. Click the plus to
expand an area, click the minus to collapse it.
4
Adventures in Data Crunching - Asha Kinney - 2010
Formulas: Copying & Using Autoll
If you have a formula you want to copy and use again, either:
1. Copy & Paste the cell that contains the formula.
2. Use the Autoll cursor to drag the formula across the cells that you want.
• Put the cursor in the bottom right-hand corner, exactly on the outline of the cell.
• It will turn to a dark + sign.
• Click, hold, and drag down to highlight as many cells as you want the formula entered into.
• Let go.
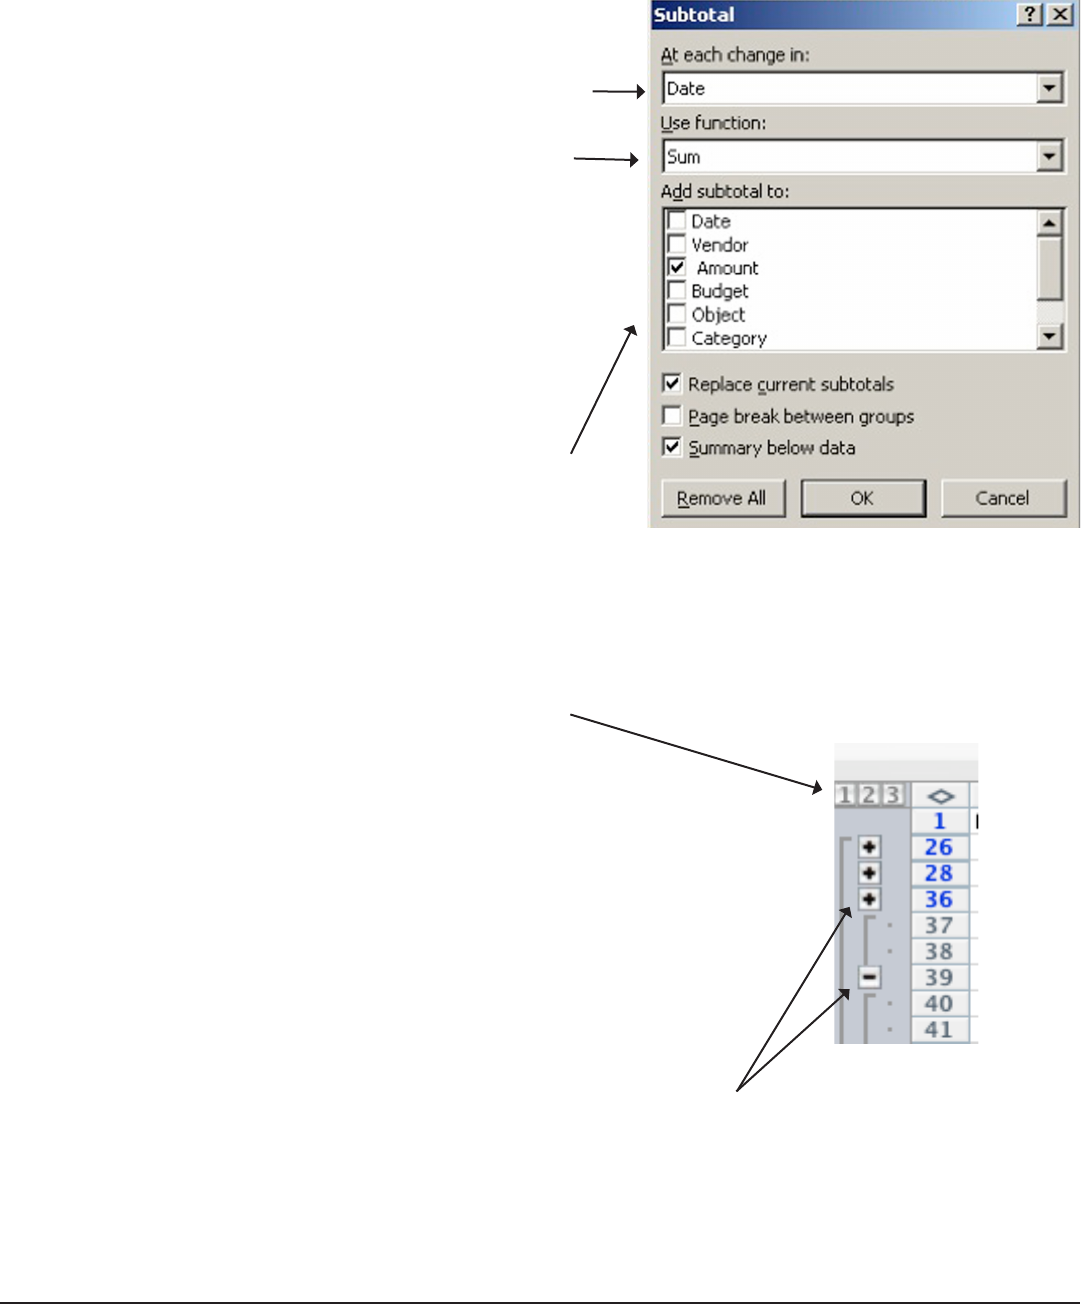
Relative vs. Absolute Cell References
Excel’s default is to use “relative” cell references, meaning that when you move or copy a formula, it adjusts
the formula to refer to new cells in relation to its new location. You can create an absolute reference if you
don’t want it to adjust automatically.
Relative References:
• In the example at left, there is a formula adding cells A1 & A2.
• When we copied that formula to cell B3, it adjusted to add cells B1
& B2 instead.
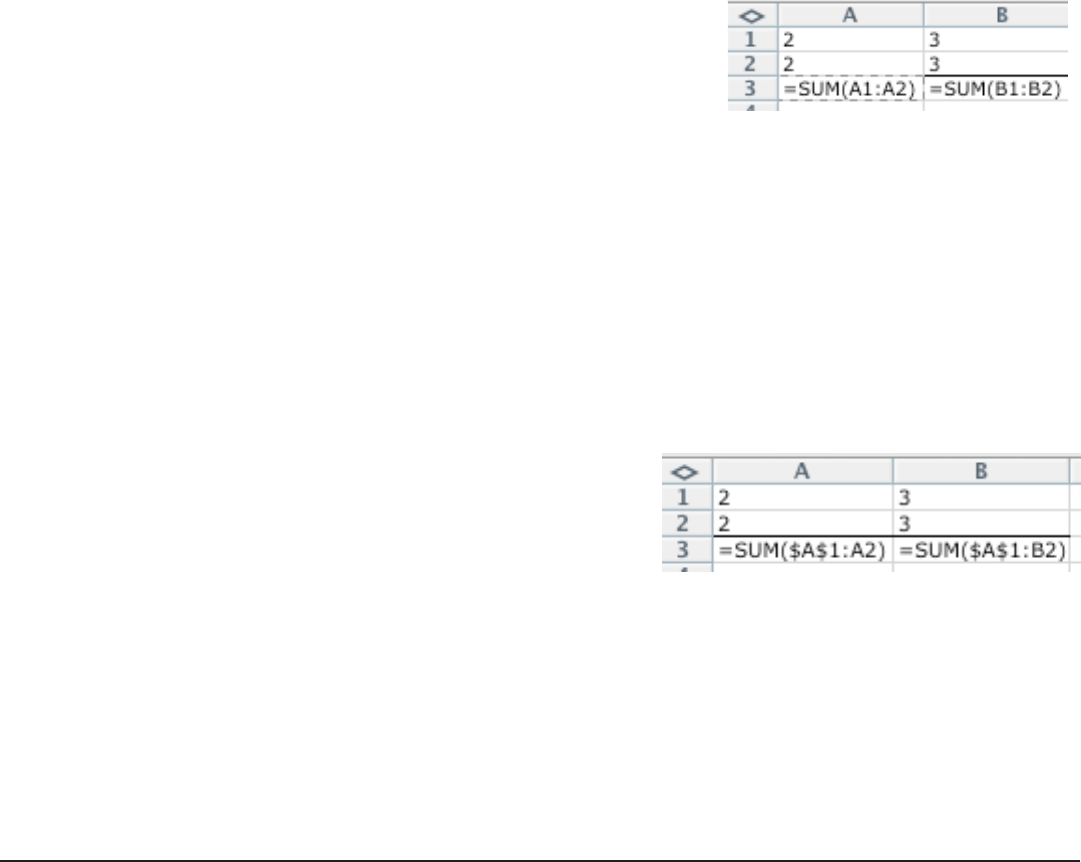
Absolute References
• If you DON’T want excel to do this, you can tell it to use an “absolute” reference, which always refers
to the same cell(s) no matter where you move that formula.
• Typing a $ in front of the letter or number of a cell reference it turns it into an “absolute” reference. You
can type the $ in front of the only the row number, only the column letter, or both. Whatever reference
has the $ in front of it will always stay the same no matter where you copy the formula.
• Let’s say we want to copy our formula again, but time we want to keep the A1 reference “absolute”- ie
ALWAYS add A1, but let the rest of the formula adjust for its new location.
• We type =SUM($A$1:A2). When we copy that formula to
cell B3, notice that the A1 remained but the B2 is the new,
adjusted relative reference. (e result here would be “5”.)
5
Adventures in Data Crunching - Asha Kinney - 2010
Adventures in Data Crunching - Asha Kinney - 2010
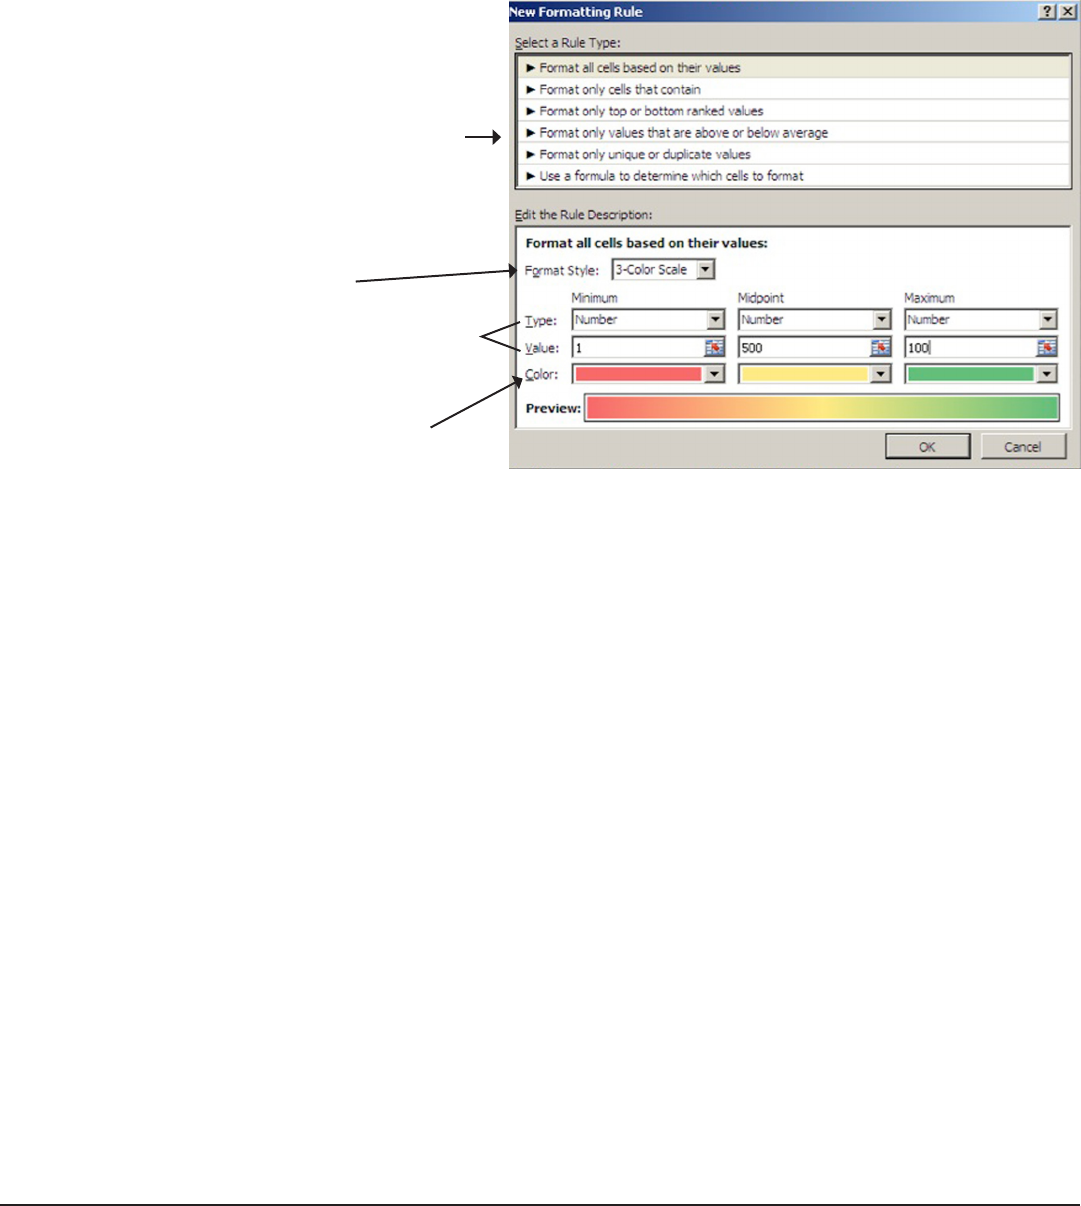
Conditional Formatting
You can tell excel to format certain values in a certain way- thus giving you an immediate at-a-glance sense
of the information and trends your data contains.
1. Select the cells/rows/columns you want this formatting to apply to.
2. Home Tab > Conditional Formatting
3. You can use one of the pre-formatted options
like “Highlight Cells Rules”, or you can
choose “New Rule” to customize your own.
4. In the “New Rule” window, choose what
you want to base your formatting on- values,
text, etc.
5. When formatting based on values, you:
• choose a 2 or 3 color scale
• choose your value ranges (they can be
set numbers, percentages, highest/lowest
values)
• assign colors to those value ranges
6. Pick what colors you want to appear for cells
matching the criteria. Excel will shade your
cells to varying degrees based on what you enter.
7. To adjust or delete existing formatting, go to Home Tab > Conditional Formatting > Manage Rules and
double click on the formatting rule you want to edit.
6
Adventures in Data Crunching - Asha Kinney - 2010
Functions
Functions are special commands, used in a formula, that tell Excel to calculate certain things in a certain
way.
ere is a drop-down menu (directly under “AutoSum”) in your Formulas tab that contains the most
popular. ey are:
• Sum: Adds numbers together
• Average: Averages numbers
• Count Numbers: Counts how many numbers there are
• Max: Returns the highest value
• Min: Returns the lowest value
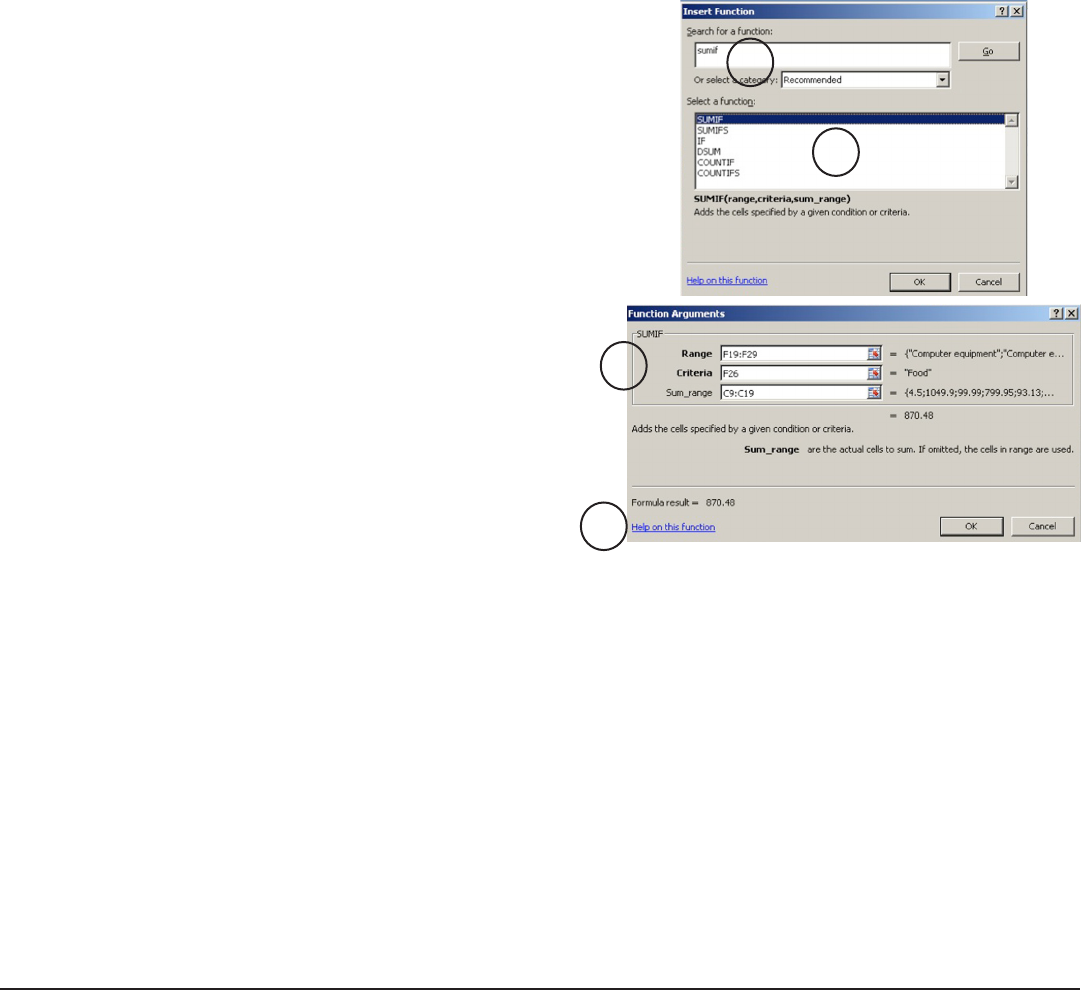
• Click More Functions to go to the Formula Builder
You can also get the formula builder by going to the
Formula Tab > Insert Function.
To use a function:
1. Select the cell you want your formula to be in.
2. Search for your function.
3. Select it and click OK for the...
4. “Function Arguments” window, where you can enter the
cell ranges and criteria you want to base your function
on.
5. Click “more help on this function” to learn more about it
or see examples.
Useful Functions
• COUNTA- is will simply count how many non-blank cells you have in your selected range. Unlike
the regular “Count” function this incudes text entries.
• COUNTIF- Counts non-blank cells that match a certain criteria. (15 records match “Apples” in the
“Fruit Type” eld)
• COUNTIFS- Counts non-blank cells that meet multiple criteria. (12 records match “Apples” in Fruit
Type AND “Atkins” in Vendor eld)
• SUMIF- Adds values if the records match a certain criteria. (We spent $100 on Fruit Type: “Apples”)
• SUMIFS- Adds values if the records match multiple criteria. (We spent $80 on Fruit Type: “Apples”
from Vendor: “Atkins”)
• CONCATENATE- Takes data living in separate cells and combines it into one cell, plus any added text
or punctuation you enter. Handy for combining rst and last names, etc.
2
3
4
5
7
Adventures in Data Crunching - Asha Kinney - 2010
Adventures in Data Crunching - Asha Kinney - 2010
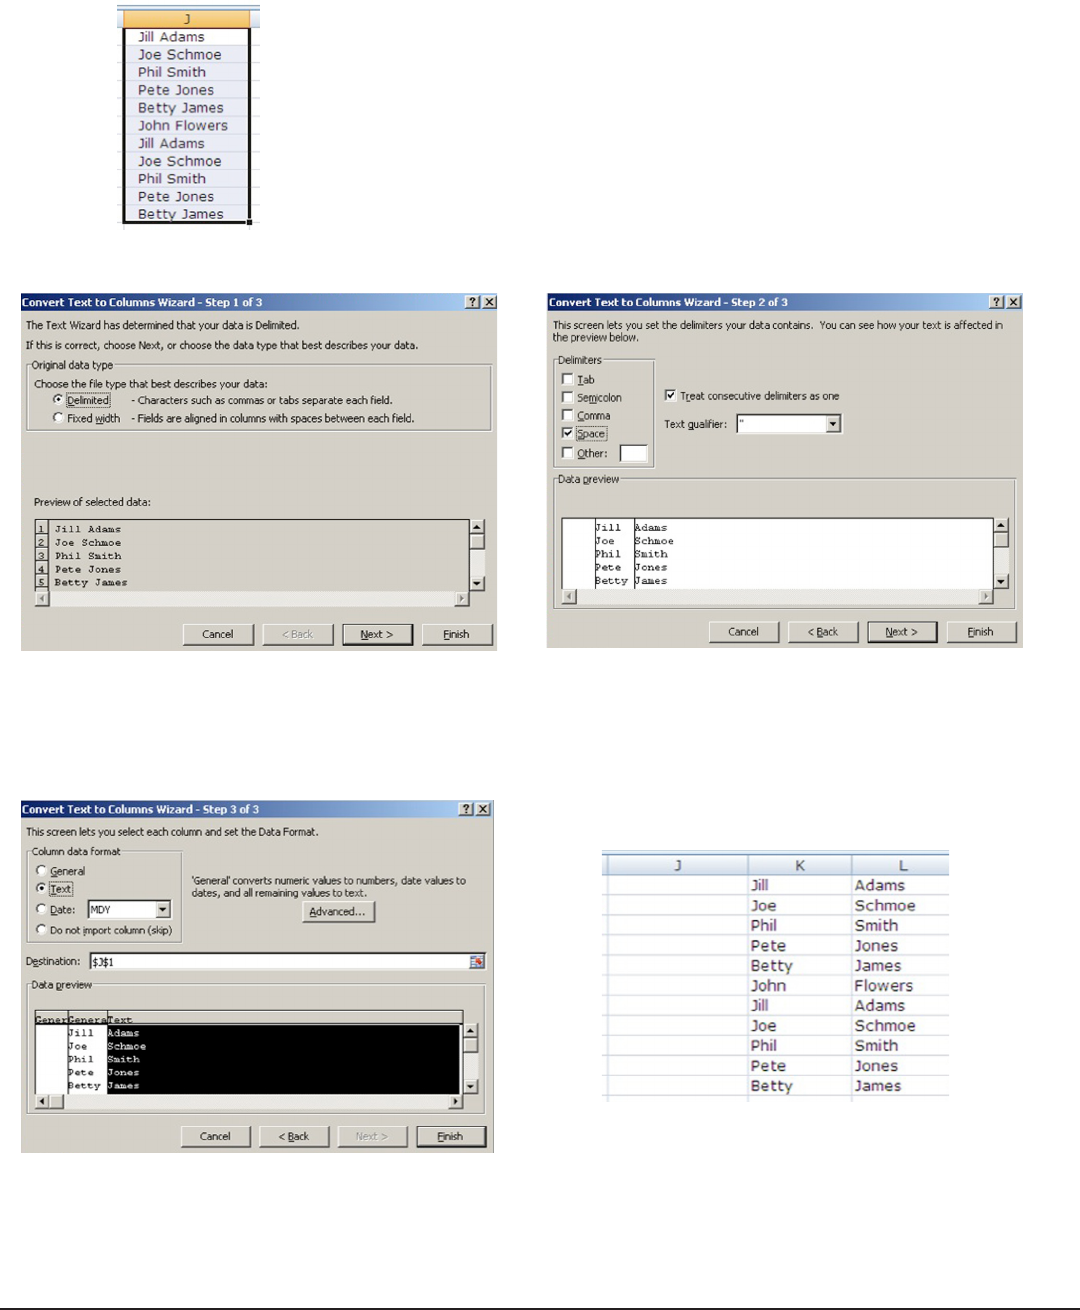
Text to Columns
is command will take data living in one cell and separate it out to multiple cells, either by delimiter or
set # of characters. is process is somewhat similar to importing data.
1. Make sure you have blank columns to the right of your data for the
separated-out data to live in.
2. Select the cells you want to split up.
3. Data Tab > Text to Columns
4. Choose if you want your data split up by
a delimiter- comma, space, etc, or if you just
want to split it by a set # of spaces.
6. Specify what kind of data each column
contains. Select the column(s) and choose from
the radio buttons.
7. e nished product.
5. If you choose delimited, choose your
delimiter. Check the preview pane below to
make sure it looks right.

8
Adventures in Data Crunching - Asha Kinney - 2010
For More Help:
Microsoft’s Oce Help Pages-
Step-by-step instructions, videos, and courses
on lots of Excel functions and features.
http://oce.microsoft.com/en-us/training/default.aspx
